Finally finished plumbing the brakes & clutch last night and bled the system. Again my good friend Dave was here to help. I would not have taken this on myself and might have brought it to a shop to get it done by a professional. One great thing about the kit is they supply 3/16″ cunifer alloy lines. These are much easier to flare, bend and use than a stainless steel (very hard) line. You can also do slight bends that are needed by hand without kinking the line. In addition Exomotive also offers an optional AN3 brake line kit that is even easier to install. Hydraulic systems in cars use your typical DOT3 but I recommend DOT4 (I’m using my last can of illegal ATE SuperBlu for this job). Flush the system every 6 months or so (more often if you track the car) as brake fluid is hygroscopic and if / when it boils it creates air in the system that will not get absorbed back in and cause the squishy pedal.

Remember the Engine Hoist – broken down and put in basement.
Tools needed:
- Brake Flaring Tool
- Brake Line Bender (these lines are easy to bend and can also be done by hand for < 45 degree bends)
- Brake Line Cutting tool (DO NOT USE SNIPS!)
I ordered some brake flare nuts but the auto parts store gave me the wrong ones (asked for a Miata and the line is 3/16th – well they gave me 3/16″ nuts for 3/16″ lines which isn’t metric). I didn’t notice this until later so before running back to get a couple (they didn’t have much in stock) I tried reusing the old ones from the old lines. When doing this make sure they are in good shape and cut the lines with a cutting tool so they are easy to remove. Then clean up the nuts with a wire brush and a thread file, then blow them out with compressed air. They did just great and saved me about $25 (after I returned the wrong ones). Learned a lesson that auto parts guys don’t really know much about auto parts.
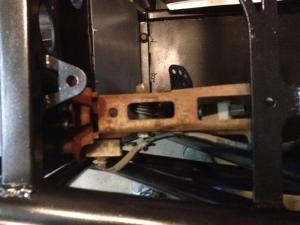
Adding Braces to Pedals: Before doing the lines we had to put in the master cylinder as well. The kit comes with 3 braces that you can use to make the pedal assembly much stronger. One mounts to the throttle pedal to the bottom and the two mount at the top to both the main pedals and clutch.
-

- Painting the clutch pedal brackets.
-

- From above with the master cylinder and pedals – note the brace on the clutch may need a new hole drilled.
-

- From below – see up top the braces you can install there to make pedals firmer.
-

- From above and side.
-

- From outside – see lower brace.
Front Brake Lines: Easiest job to do at first was front brake lines as the engine was removed making it really easy to get access. Lines are run on the side so that they are out of the way of rocks or rods coming through an engine block cutting a line (I hope the latter will never happen). Also notice no proportioning valve as we are running a brake bias line to the rear so don’t need it anymore. Make sure you secure them down well as you don’t want the hardlines to move or rub against anything. Next up was to fabricate up some tabs to mount the hardlines to the flex lines – before cutting the final hard line – make sure flexible lines do not get stretched when you turn the wheel both directions. You may need to add or subtract length and all depends on your flex lines. To make the bracket cut 1″ wide by 1/8″ thick plain steel to preferred length. Bend to fit and cut down and get rid of sharp 90 corners (great for slicing skin). Mount it to the lower subframe at the lip.
-

- Dave starting the lines – engine out makes this a breeze.
-

- From up above master cylinder.
-

- Run down to drivers front.
-

- Stepper drill bit to make tabs for hardline to flex line.
-

- Tabs installed.
-

- Full lock out.
-

- Full lock in.
Rear Brake Lines: Since I’m running a rear bias valve I ran it on the drivers side tunnel so I can mount the adjustment valve closer to the driver. If you are not doing this then run it to the passenger side (you’ll note as soon as it runs from my valve the line goes to the passenger side. This is because if the driveshaft fails the brace that connects the rear end to the transmission will protect the brake line and continue to give you rear brakes. I’m running a stock Miata SS line kit so it includes the distribution block. The Exocet chassis will require you to turn it 180 degrees as the bulkhead will block the input line from the master cylinder. Make sure you note which way first. Then running the lines back there is easy to as the hard to flex line tabs are reused on the drivers side.
-

- From Master Cylinder
-

- Running back towards tunnel (on drivers side)
-

- To brake bias valve (make sure it’s fully open for bleeding). Then runs over tranny to protected side of tunnel.

-

- Run to distribution block and then back over to drivers rear.
-

- To distribution block. Note backwards installation as rear bulkwark impedes normal mounting.
-

- Another view of pass rear.
-

- Drivers rear.
Clutch Lines: We installed the engine before we did this as we needed to see how the coil fitted to the firewall. I also bought the long SS line that eliminates the curly Q line. The biggest challenge was running the line from the clutch master cylinder to the clutch slave. The out of the clutch has ~ 1″ of clearance from a chassis tube and requires a 90+ degree bend in order to plumb it back into the engine bay. I did not think of it at the time but a good option might be a 90 degree fitting to run there.
-

- 90 degree bend needed to turn and avoid chassis brace.
-

- Run from slave cylinder – follow brake lines.
-

- Reuse stock tab and drill into brace. Make sure lines do not touch.
Bleeding the System: A vacuum bleeder makes this really easy but is not necessary. If you are doing this without one you may need to add pressure to the master cylinder to push the fluid into the air filled lines as the pedal might not be able to generate the pressure yet. This is the fun part as you may have some leaks (this is more normal than you think with newly formed lines as you don’t want to over-tighten them). So when a leak is discovered only do a 1/4 to 1/3rd of a turn at a time then rechecking under pressure. You do not want to use all your strength as you may split the line causing all sorts of trouble (and having to run an entire new line).
Steering Installation: Now that the brakes and clutch are done and bled it was time to add the steering column back in. I’m not running a key so didn’t need the ignition. I’m putting in an ignition panel with push start button instead. It also removes the steering lock as well. Locktite blue the steering shaft bolt for extra security. Use the included steering column bracket and bolt it in.
I also installed the Driven 13.5″ Deep Dish Steering Wheel and bolt on quick release for the Miata. I had to get a 3 hole to 6 hole adapter which added another 1″ (note that Driven also sells a 3 bolt adapter as well). I’m tall so another 1″ will help me reduce the reach to the wheel. Racing you want a perfect 90 degree bend in your elbows to reduce fatigue in steering. Then when turning you “pull down” to steer rather that “push over” like most drivers do.
-

- Clean and paint steering shaft.
-

- Driven Steering Wheel – beautiful!
-

- 360 degree quick release that bolts onto Miata shaft. Recommend getting a spot weld to hold it on permanently to shaft.
-

- Installed

-

- From drivers view!
-

- Steering shaft in engine bay.
Exomotive Emblem: I had my friend Scott Rhea at http://www.plasmatracks.com cut out an emblem that I wanted to proudly display on my transmission tunnel. It is 6″ wide as I wanted something easy to see. But some smaller 3″ ones might do the trick for a hood emblem or something. You can contact Exomotive if this is something you are interested in.

Can be mounted in front of radiator.

I painted it engine block red and like it here on the tunnel.